Below is something that I have read about you:
“I feel most guilty about Hattie. I basically missed the first year of her life. I’ll be trying to make it up to her forever. She spoke her first word ‘dada’ when I was away and she started crawling.
“She would visit but I couldn’t hold her. I still can’t because of my latest surgery. I haven’t held her on my own since she was five months old. I’m constantly worried about what our relationship will be like. Even now if she falls it’s Dean she reaches for not me. She doesn’t even know me.”
I thought that I should share with you my story about me and my mother and what happended to me when I was born.
I was born with a heart problem, my blood system was wired incorrectly in my heart. Meaning, oxygenated blood is to travel around your body and come back to the heart "dirty", your heart cleans it and the cycle begins again. This was not what was happening with me, 'dirty' blood went around my body and cam back to the heart to be oxygenated. conffusing you? Anyway I was born the colour blue from a lack of oxygen in my body, I was immediatly taken away from my mom and put into intensive care. The base of the story is, my mother couldn't hold,feed or touch me for 2 weeks. My mother and I now have relationship issues, my mother feels disconnected to me and she believes thats because of our lack of being able to bond when I was so young.
To me I love my mother no matter what, yes we have issues, who doesn't (you and Candy for example) but like you and your mother, everyone can overcome these relationship issues.
Honestly Tori, Hattie will love you sooooo much when she is older, she will have forgotten that she didn't see you as much as you hoped, but she is your daughter and you are her mother, nothing can take away your amazing connection. Please don't be so guilty about Hattie, I understand that you feel like you have let Hattie down, but you can still create a bond with her and you both have many years to experience with each other.
You are an amazing mother Tori, don't ever forget that.
DIY: Yarn Letters

Materials:Yarn
Cardboard (or purchase block letters)
Pencil
Scissors
Tape or Hot Glue

How To Make Yarn-Wrapped Letters:
1. Print letters out on standard printer paper (I used AR Essence, font size 750). Cut out the letters.
2. Trace letter on to cardboard. Cut out each cardboard letter using a box cutter or pair of scissors.
3. Cut a small slit in the cardboard letter where you would like to begin wrapping.
4. Insert the end of yarn into the slit, then tape or glue the yarn end to the back of the letter. This will help keep the yarn in place better.
5. Wrap yarn around the letter in the same direction.
6. When you reach corners, start wrapping yarn in the opposite direction to cover the remainder of the letter. Hot glue, tie, or tape any loose ends to the back.
7. Attach letter to the wall with a command hook, picture hanger, or hot glue a 6" piece of yarn to the back of the letter, then hang from a nail.

DIY Button Rings

MATERIALS
Ring findings I use the adjustable sort with a perforated disc or screen, used to make beaded rings, found at bead supply shops.Embroidery thread or dental floss
A selection of buttons Flat or sew-through buttons work best, but you can also use small shank buttons.
DIRECTIONS
1. Choose your button(s).If you want to stack your buttons, you can sew them together before attaching them to the finding. Sew through them once or twice and tie a firm knot on the underside. I used a mixture of vintage and new buttons.
2. Sew your button(s) to the finding.
Sew right up through all the button layers if possible, lining up the holes as you go. If you can’t sew through the buttons, just sew the disc to the buttons by passing the needle through the knot on the underside. Sew them on firmly, and tie off your threads at the back or weave them back in under the disc to hide the ends.
3. Slip on your ring.
Show off your bling! When you get bored with the buttons, you can just snip them off the disc, return them to your stash, and make some new rings.
This blog was found off Craft: Transforming traditional crafts, so if you want more crafting ideas click the link below and you will find lots of creative ideas.
http://craftzine.com/
Party Planning 101
This coming weekend my cousin is having her 30th birthday party. Lucky for me, I am planning it and am organizing everything that goes with it. Even though it is going to be a small party (only family), I intend to go all out and make it amazing.
Throughout the course of planning, creating and then the finished outcome, I will show you, how to create some of the decorations, food (and decorating the food), the set up of food tables and where you can get some of the products to create them yourself.
So you can get an idea of a starting point for the party, I have asked the guest of honor to select a colour combination. Which is tangerine and teal and then I emailed a long list of possible food that could be used and the guest of honor is to narrow down that list. A theme is currently under construction and I am having to keep in mind that there will only be 11 people at the party. On a positive note that is an easy number to cater for.
So, Throughout the week I will update you on whats happening and post some of the DIY crafting that will be used for the party, because we all know that handmade crafts make everything look and feel better.
Have you ever planned a party and what did you create yourself?
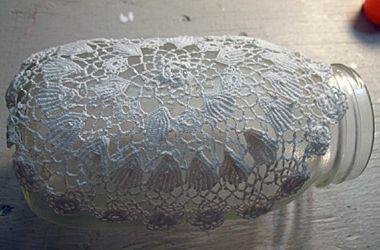
How to: Lacy Mason Jars

-Mason Jar
-Doilies
-Adhesive Spray
-Hot Glue
-Tea Lights
-Ribbon, Burlap, String, Twine
-Buttons, Beads or accessories of your choice
-Long Reach Lighter
What to Do:
Step 1:
Spray jar or doily with adhesive spray

Step 2:
Wrap and press doily on jar (as smooth as possible)
Step 3:
Use hot glue to affix tea light to the bottom of the jar

Step 4:
Decorate rim with ribbon, burlap, string, or twine and accessorize it with a cute button or accessory or your choice

Step 5:
Light tea candle with a long reach lighter

Up and Down We Go
Like I said in an earlier post, I am redecorating my bedroom. So far all I have been able to do is sand down my window sills and paint about half of my bedroom with an undercoat.
When you are decorating a room of any kind you need to create a mood board so that you can sort out your ideas and make it complete. I have explained the mood board in my second post so I'm not going to repeat it.
http://hilaryscraft.blogspot.co.nz/2012/04/beginnings-of-crafting.html
My colour palette is creme,purple and coffee. My walls are to be creme, For a pop of colour and excitement I am putting in purple curtains. For the rest of the room, decorating wise I am going to mix and match the coffee and purple. I have been told and read that for any room of any size to maximise the overall finished look, it needs to take time. You can repaint walls and things like that, but over time you an add and rearrange furniture and place little extra details around the room like a rug, flowers etc.
Here are some pictures of my room so far:


Light up the can: Tin Can Luminaries
You can do a lot of things when it comes to lights and lighting. I have found this idea on www.torispelling.com I am using her images and words because my pictures didn't come out very clear.
The site is called EdiTORIal and is run by Tori Spelling. Its an online community for people who love to craft and anything else that is related to crafting.

Materials:
-Tin cans (as many as you feel like and whatever size)
-Hammer
-Nail or screw
-Tissue or rice paper
-Votive or tea candles
What to do:
Step 1:
Find a location that is not a hard surface. You will be hammering, so some give in the surface is important. You can do this project outside in the grass, on a blanket.
Take your tin can (labels removed) and lay them down on your surface.
 .
.
Step 2:
You can either create a template before hand with a dot-outlined image(s), or you can freehand your design.

Step 3:
Take your nail or screw and begin to hammer holes directly into the tin can in your design. You may want to wear gloves to protect your fingers.
Make sure that the holes you create penetrate the can and are not just indentations on the outside of the can.

Step 4:
Once your design is made, you can cut paper to the size and wrap it around the can. I used gold rice paper here. Glue it to secure. Place your tea/votive candle inside and light. To secure the candle to the bottom of the tin can glue the bottom of the candle and press onto the tin can.


The site is called EdiTORIal and is run by Tori Spelling. Its an online community for people who love to craft and anything else that is related to crafting.

Materials:
-Tin cans (as many as you feel like and whatever size)
-Hammer
-Nail or screw
-Tissue or rice paper
-Votive or tea candles
What to do:
Step 1:
Find a location that is not a hard surface. You will be hammering, so some give in the surface is important. You can do this project outside in the grass, on a blanket.
Take your tin can (labels removed) and lay them down on your surface.

Step 2:
You can either create a template before hand with a dot-outlined image(s), or you can freehand your design.

Step 3:
Take your nail or screw and begin to hammer holes directly into the tin can in your design. You may want to wear gloves to protect your fingers.
Make sure that the holes you create penetrate the can and are not just indentations on the outside of the can.

Step 4:
Once your design is made, you can cut paper to the size and wrap it around the can. I used gold rice paper here. Glue it to secure. Place your tea/votive candle inside and light. To secure the candle to the bottom of the tin can glue the bottom of the candle and press onto the tin can.

And there you have it, your brand new light. You can use this concept at any time of the year or to add a personal touch to someones bedroom.

Subscribe to:
Posts (Atom)