Reduce, Reuse and Recycle the crafty way!

Its easier said than done to reduce, reuse and recycle. But I have found one way that you can and still keep it crafty,classy and carefree!

What you will need:
-Scissors
-Ribbon or string (if desired)
-A glass bottle of any sort (beer,wine energy drink...)


What to do:
First off you need to clean your glass bottle unless you already have. Make sure it is fairly clean because as your bottle sits around it may start to go moldy or smell.


Next you need to remove that sticker on the outside, for my bottle I was able to just pull it off but you may need to run it under hot water and scrub off any extra paper left on it.


Once the sticker/label is removed, get rid of the bottle lid and cut the ring around the neck of the bottle off.


After that, go and find some flowers that compliment the glass bottle. You don't always have to colour coordinate them both but I think it makes the finished look more fresh.


Fill your glass bottle with water and arrange your flowers to suit. This is an option you can do if you prefer it to be without the ribbon or string.


Now with your ribbon or whatever you are going to use, snip it to your desired length and tie it around the neck of the bottle.


I chose to use both the white and orange ribbon together to create a look that compliments the flowers petals. Again you may choose other wise.


Finally. Simply arrange the flowers to your taste and style. You don't have to use flowers that are all the same colour.


For your finished look, you can place your flowers anywhere. If you want, place the petals that have fallen off during the arrangement of the flowers around the base of the bottle.
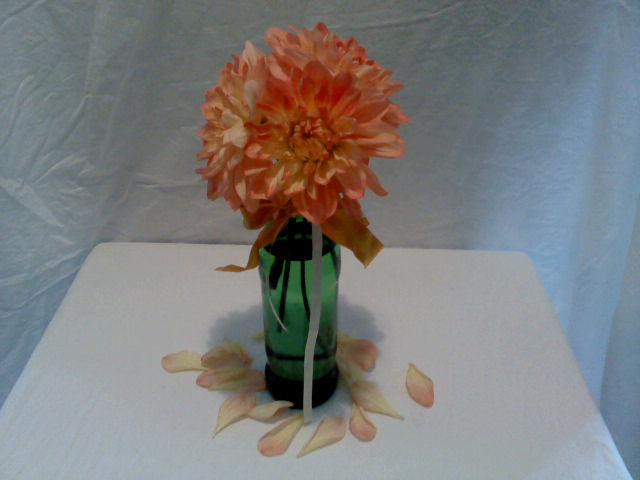


And there you have it, your recycled glass bottle vase. This concept can be used as a party decoration, house decoration or a centre piece at a table! Would you alter the look and how?

Face Lift Time

Just to make it clear I do not mean anybodies actual face.

I am currently redecorating my bedroom!!

So far all I have done is sand-paper the wood on the windows because well lets just say they were not pretty, but they are now!!!

Over the course of this project I am going to update my blog with what I  have done, so to start off here are some 'before' pictures of my bedroom.


Make a pop with the Pop-up card!

I was looking through my favourite website and found this great crafting creation!
In the images its based on Christmas, but you can do it for any occasion.

What you will need:
• Several sheets of cardstock or pre-cut blank greeting cards
• Scissors
• Embellishments (ribbon, construction paper, etc.)
• Glue
• Markers

What to do:

Step 1:
Take your cardstock and cut 2 rectangles sized to 3x10. These will create your greeting card forms, so you will be folding them in half. If you have purchased pre-cut blank greeting cards, skip this step.

Hold card horizontally in your hand. At 1 ¼ inches in from each edge, cut an inch slice into the card.
Step 2:
Push the remaining paper that sits between each slice inwards, so that you leave a gap between the two slices. It should look like the above. This will act as your pop-up function.

Step 3:
Create a stencil of the object you would like to pop up in the card. A reindeer, Christmas tree, menorah, whatever you like.

Step 4:
Cut out the stencil and embellish with whatever you like.


Step 5:
Glue your pop-up feature to the pop-up tab on the inside of the card. (Be sure to see that the pop-up feature is the right size to still fit inside the card when folded over.


Step 6:
In order to hide the cut out section on the outside of the card, you will glue another card over it.

Step 7:
 Once your outer is fastened, you can write your personal message on the inside and embellish the outside however you like.

The beginnings of crafting

One of the first steps to do before you start crafting is the all important planning.
Its not always necessary but it is helpful and you can sort out all the details however small or big.

When I started getting ideas for my room I decided to write down my plans for how my room will look, colour scheme and anything else I deemed important.Once I have sorted out where I want furniture, art and decorative objects positioned I began on my mood board. Mood Boards are a great way of sorting out your plans and ideas. You can use them for planning party's of any sort, decorating or redecorating, they are the launch pad of any great crafting idea. They are always there to refer back to if you are in doubt. I would advise you to interpret a mood board to what ever you are going to make.

To have a successful mood board you need to have a range of image cut outs, fabric swatches, objects like buttons or anything else that catches your eye. You can compose you board however you want. For me I love the hands on effect, by cutting things out and sticking them onto a board that can hold all your ideas. But if you want to get it done asap or would rather it done online then that's fine too. If so here are some sites that are great to use:

http://pinterest.com/

http://www.polyvore.com/

These sites make it simple, even for the most non tech savvy person in the world!

When it comes to composing you mood board, don't be afraid to put multiple colours on and to mix different styles. Remember CLASHING IS OK. Once you have finished begin to decide what colours, patterns and material you prefer the most and see if you can determine any themes.

If you want you can compose another mood board so you can refine your design
 and colour pallet. There are no rules just you personal preference!


Once you have completely finished your mood board you should be able to see a clear path ahead of what you want to achieve. If its not exactly how you imagined it that's fine, with practice you will have more of an eye for what works and what doesn't.

Welcome and my crafting history

Welcome to my new blog!
I have decided to start a crafting blog because I am currently redecorating my bedroom.
As part of my redecorating I am going to craft and do it all myself. Inspired by this I thought why not record my crafting and better yet why not on a blog where other people can see,learn and be inspired to craft yourselves.

I have always enjoyed the relaxation and creativeness of crafting ever since I was little. When I was 9 I started scrap booking and took art classes. I am now at high school and am taking art as a subject. I love how you can create what ever you want and make it the way you want. For me its a great way to take a step back from the stresses of life and just be in the moment, so my goal for this blog is for you all to hopefully use some of my tips and tricks to create your on craft pieces and be pleased with the outcome


There are no rules. Just follow your heart.
Robin Williams, Actor/Comedian


Happy crafting everyone!!!